If you’ve ever worked on a WordPress site—whether as a developer, designer, or content editor—you’ve probably run into this head-scratching situation: You just changed something on a page, hit refresh, and… nothing. No change. You try a different browser. Same result. You clear your browser cache. Still no luck.
Welcome to the wonderfully frustrating world of caching — a blessing for performance, and a curse for development.
In this article, we’ll explore why caching causes so much confusion when working on WordPress sites, what different layers of caching can get in your way, and the top 3 strategies you can use to stay sane while working in cached environments.

What Is Caching and Why Does It Matter?
Caching is the practice of storing a copy of content so it can be served faster the next time it’s requested. Instead of WordPress generating the same page dynamically on every request (which can be slow), caching makes things quicker by serving a pre-generated version of that page.
That’s great for site performance and scalability, but when you’re actively working on the site, this leads to a paradox: the content is updated, but you don’t see it—because what you’re seeing is an old cached version.
The Many Faces of Caching
Caching can happen in several layers. Understanding each one is key to knowing where your changes might be getting lost.
1. Browser Cache
Your own browser stores static files like images, CSS, and JavaScript to load websites faster. This is the most immediate cache and easy to clear. But it’s only one piece of the puzzle.
2. WordPress Caching Plugins
Plugins like WP Super Cache, W3 Total Cache, or LiteSpeed Cache store entire HTML pages, database query results, or even object data (chunks of PHP data). These plugins often have multiple layers of caching themselves and their own purge mechanisms.
3. Server-Level Caching
Your hosting provider (e.g. Strato, IONOS, etc.) might be using server-side caching, such as Varnish, NGINX microcaching, or Redis/Memcached for object caching. These layers sit in front of WordPress and serve cached responses before WordPress is even touched.
4. CDN Caching
If your site uses a Content Delivery Network (CDN) like Cloudflare, it might cache HTML pages and static content across global edge servers. CDNs sometimes aggressively cache pages for performance, especially on lower-tier plans.
5. ISP or Proxy Caching
Though less common these days, sometimes your Internet Service Provider (ISP) or a corporate proxy server might cache web content too. This is more likely in enterprise or controlled network environments.
So, if your WordPress site isn’t showing changes, you’re potentially looking at five different layers of caching. Each one might be to blame.

The 3 Best Ways to Stay Sane While Working with WordPress Caching
Despite the chaos caching can cause, there are ways to regain control. Here are three proven strategies:
1. Work with Caching Aware Tools and Flush Strategically
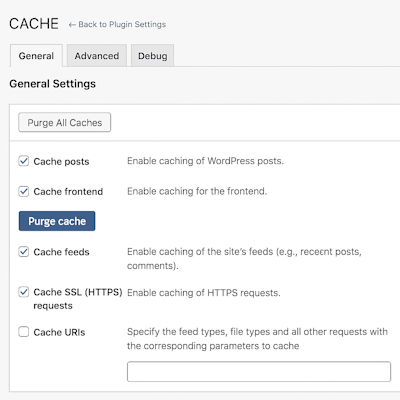
Most WordPress caching plugins come with an option to clear (or “purge”) cache. Make this your friend.
- Learn where to clear what: In W3 Total Cache, you can selectively flush page cache, object cache, database cache, etc. In LiteSpeed Cache, you can purge specific URLs.
- If your hosting provider adds another caching layer (like Kinsta or SiteGround), check your hosting dashboard for cache purge options.
- CDNs like Cloudflare allow you to purge cache by file URL or entire site. Use this sparingly, as full purges can take time to propagate.
🔧 Pro tip: Always check the “Last Cached” time if your plugin or CDN shows it—it helps confirm whether a purge was successful.
2. Use Development or Staging Environments
Working directly on the live environment is risky—and painful when caching gets in the way.
Most modern hosts offer staging environments. These are exact copies of your site where you can safely test changes without affecting live traffic—and often, without aggressive caching enabled.
- Use staging to work freely and only push to live once everything looks right.
- Some managed hosts automatically disable or reduce caching in staging, making your life easier.
🔧 Pro tip: If you’re using a local development tool like LocalWP or DevKinsta, caching usually isn’t an issue at all until you push the site live.
3. Bypass Cache While Working
Sometimes you just want to see your changes now, without manually clearing caches every time. Here’s how to force cache bypasses:
- Add cache-busting query strings to your URLs when testing (e.g., ?nocache=1). Some setups ignore query strings, but many don’t.
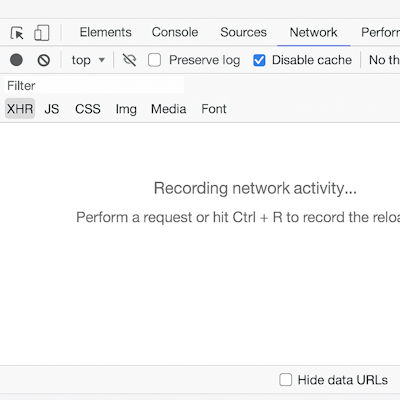
- Use browser dev tools: In Chrome, go to the Network tab and check “Disable cache” (while DevTools is open).
- Use a plugin like “Cache Bypass for Logged-in Users” – ideal for admins and editors. Many caching systems exclude logged-in users from caching anyway, but make sure yours does.
- Consider setting short TTL (Time-To-Live) values in development (e.g., 1 minute) so that cached content expires quickly.
🔧 Pro tip: If you’re stuck, try an incognito window and a different device. If it still shows old content, the cache is definitely upstream (CDN or server level).
Conclusion: Caching Is Necessary — But Manageable
Caching is essential to keeping WordPress sites fast, but when you’re in the middle of development, it can feel like you’re fighting ghosts. The trick is understanding where caches live, how to clear them, and how to work in environments where you’re not constantly guessing.
To recap:
- Know the layers of caching: browser, WordPress, server, CDN, and even ISP.
- Use smart tools and strategies: clear caches precisely, use staging, and force cache bypasses when needed.
Once you’ve developed a caching-conscious workflow, you’ll save time, avoid frustration, and build WordPress sites with a lot more confidence.
Have your own war stories with WordPress caching? Share them in the comments—misery loves company!